Tuesday, September 30, 2014

'Miss M'

Hello there!
I'm back...Geraldine here to share a layout once again of my daughter Mackenna.
My favourite colours to scrap are ~ Teal-Turquoise-Brown-Gold and shades around the spectrum of those and today I decided to create with the softer palette of those.
'Miss M'
 
 
UmWowStudio Products:
 
 
Paper, Stamps and tags -Nature Walk & 9th Wave from 7DotsStudio.
Colour - Lindy's Stamp Gang, Art Anthology. irRESISTible's & Tim Holtz
 
 
I started the page by priming with Gesso, applied all the stamping then I used Modelling Paste for the stencils, added all the colour to the background...added a little too much so simply covered with another layer of gesso to hide my overkill. The chipboard is first inked and then coated in Tim Holtz crackle paint and various inks and sprays.
Once all my embellishments etc. are in place I went back and added a little more colour and stamping enjoyed a cup of Tea and decided to add a little bit of  that Tea in spots too!


Hope you enjoy  looking at my layout and thanks for dropping by the blog...See you soon! 

Thursday, September 25, 2014

come too late - art-journal by Tusia Lech

Hello UWS fans :)

Lately I journal a lot and today I would like to share with you one of my journal spread. I played with gorgeous UWS stencils using different media - I will try to tell you a little bit about techniques I used.


I began with priming both pages with Finnabair Clear Gesso. It gives tooth and prevents all media from soaking through the pages.


Then I applied Luminarte Silks using wide brush. Next step was gluing down some paper stripes. And then - the magic begins :) I started to play with UWS stencils and different media.


Above you can see UWS Hexagon Mask - I sprayed Glimmer Mist through it. On top of it I applied Finnabair 3D Matte Gel mixed with LSG Magicals using UWS Circle Confetti Mask


UWS Circle Confetti Mask was used by me also with Finnabair 3D Gloss Gel (last photo) and Glimmer Mists (photo below). Each layer had been dry, before I have applied the next one. A cherry on a top was a chipboard from UWS Love Confetti Chipboard set.


I have added some stamping using Nature Walk (7 Dots Studio) stamp set and alpha stamps.


On the photo below you can see also flying butterflies, that I created using Glimmer Mist and wonderful UWS Butterfly Swarm Mask.


Final step was creating some splashed using white Ecoline and adding some drawing using pencil.

I hope you liked my art-journal :) Thank you for visiting UmWowStudio blog today!
Tusia Lech

UmWowStudio supplies:
Circle Confetti Mask
UWS Love Confetti
UWS Butterfly Swarm Mask

Wednesday, September 24, 2014

Simplify Your Life with Home Decor Projects

Hello and Happy Wednesday!  Tina here today with a Home Decor project that used Chipboard in a fun way!

If you have been following me for some time, you know that I am a fan of Home Decor projects, especially wall art.  I am totally obsessed with created unique, one-of-a-kind wall art that can be displayed in my home. 

Today, I'll share with you how I created my 'Simplify' project, using just two different chipboard pieces, a piece of flair, and several items from your stash.


I used basic techniques to to enhance my chipboard pieces.  To create an old, rusted look to the Fleur de lis Weathervane chip, I applied rusting powder (from Dusty Attic) to a pre-gesso'd chip.  To create some variation in the rust look, I sprayed the chip with several shades of spray mist.


To enhance the Garden Gate chip, I applied moderate amounts of paints, sprays, and texture mediums to create transform the chip to a real garden gate.


To complete the country theme, I added the Star flair from the Wild West Flair collection.  I love the pop of color it added to the neutral background.


It's amazing how just a couple pieces of chipboard can create an amazing piece of art work.  I am loving how this turned out!

Do you like to create Home Decor projects?  Do you use chipboard?  Please share!  I need some inspiration!  :)

Thanks for stopping by today! Have a great day!

Tuesday, September 23, 2014

The Plane! The Plane! - A Mini Album

Hello all!

Have you ever played with any of the UmWowStudio Books? They're such a fun size and there are very cool shapes to choose from.

I made a mini album with the Waterfall Bracket Tag Book. It's got these graduated pages so you get a sneak peek at the page beneath each top page....I like it! I used a ton of different UmWowStudio goodies to get this book done :)

We took a trip to the famous Maho Beach on Sint Maarten where the Princess Juliana Airport is. The planes have a very short runway and they fly right over a beach where there are always a ton of people waiting. It was nerve wrecking and exhilarating all at the same time!


Have a creative day!

Supplies: 
UWS Waterfall Bracket Tag Book
UWS Chevron Confetti
UWS Circle Confetti Mask
UWS Arrow Title Mash!
UWS Oh The Places You'll Go Flair
UWS Mustard 29 Flair
UWS This Day Hashtag Banners

Saturday, September 20, 2014

Guest Designer Riikka Kovasin

Today we have the fabulous Riikka Kovasin joining us again! We love her mixed media delicious style.


My name is Riikka Kovasin. I'm a mixed media style crafter from Finland. Scrapbooking layouts are my
biggest passion, but I also love to create canvases, cards and recently I've grown an interest on ATCs. Please visit me on my blog or other social media sites!

[You can find me: blog | Facebook | Instagram | Twitter | YouTube | Pinterest]


Hi there! Riikka here to share a few projects with you! I'm so happy to be invited to guest here at UmWowStudio and play with the fantastic goodies! Thank you DeeDee for this opportunity!


For my first project I created a scrapbooking layout. One evening while we were in the park and kids were playing, I was trying to be cute and said to my husband that I'm silly about him. He then turned the
sentence into a wordplay and the title phrase "I'm herring about you" was born. Maybe you would like to
hear the explanation? The word "silly" is pronounced the same way than the Finnish word for herring, silli.


Strange humor perhaps, but we share the same kind of sense in that. I started the page by applying gesso to the background and then added some mists on top.


I then used the UmWowStudio stencil to create a subtle pattern with PanPastels. I used the same stencil to create the 3 D effect here and there and finished the bubbling feeling with different circle chippies. You can see the process from the video I made!


Supplies from Um Wow Studio:
Circle Confetti mask, Button MASH, Circle Confetti, Layered Arrows, Make A Wish flair set


I also made a few tags for this post. I love how real looking the plant chippies from UmWowStudio are.
I colored the chippies first with different embossing powders sprinkling them there where they were
needed. Then I added other media like PITT pens, alcohol markers, pencil and Archival Inks on top to get
the grungy feeling. There's also more than one coat of embossing powders in the pieces in order to achieve the natural look.


All the tags are assembled the same way, only the colors change in each one. For the daisy I used yellow
and made the ribbon into a bow to give it a slightly feminine look and also to balance the composition. The bluebelle on the other hand has quite naturally blue color scheme and the thistle purple. For those I used smaller amount of ribbon and a black thread to get stronger look. The papers used in the tags are from the 7 Dots Studio's "Nature Walk" collection, designed by DeeDee!

Supplies from UmWowStudio:


Circle Confetti mask
Button MASH
 
Thank you for joining me here today! I wish I have inspired you! If you have any questions, please just leave a comment or mail me! Wishing you all a lovely day!

Thursday, September 18, 2014

Mixed Media Plaque with Jen

 It is no secret that I love texture AND color!  I can't get enough of bright, gorgeous color and patterns and textures.  This project has both in large doses!   I started this project while I was at the Faber-Castell headquarters in Cleveland, Ohio!  I had it sitting on my desk just waiting for the final finishing touches to make it complete.  Finally, I gave it more texture and some fun UmWowStudios embellishments and I'm thrilled with the result!
 The Butterfly was just the perfect focus on this plaque.  I added WOW embossing powder to create a sparkly centerpiece!
 Here is a great photo of the sparkle!  I am in love with those new Printer's Block alphas!  The fit perfectly in this resin window too!  I stained the block part with some brown ink and left the letters natural.
 Lots of texture added with Faber-Castell Design Memory Craft Whipped Spackle through a net stencil. Splattered with Chalkboard paint adds some contrast.


 The Harlequin background gives the whole piece some grungy loveliness!  I love the natural look to the chipboard.  UmWowStudios has the best edges too for these gorgeous shapes!

I love creating bright mixed media pieces and this one makes me smile.  Thanks for letting me share with you today!

Material list:
UmWowStudios chipboard:  DIY Printer's Block alpha, Distressed Harlequin Background, Butterfly
Faber-Castell Design Memory Craft Whipped Spackle
Faber-Castell Design Memory Craft Double Scoop Gelatos® in Snow Cone, Mango, Lemon, Metallic Mint, and Margarita Mix
Faber-Castell Design Memory Craft Chalkboard Paint 
WOW Embossing Powders
aMuse doily
Prima Marketing window
Wood Plaque


Tuesday, September 16, 2014

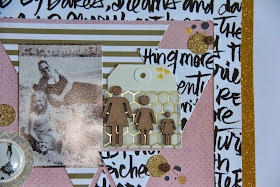
From mom with love

 
Good morning friends! Brianna here. Let me start by saying that I never thought I could LOVE a flair button before , that is until I first set my eye on this flair from the from the heart collection. Seriously, this is the greatest button for creating projects that you can pour your whole heart into; my kind of projects.
After finding the right papers for my project and to properly do this amazing pin the justice it deserves, and laying out my design, I checked through my stash of UWS goodies for the perfectly coordinating embellishments. I had gotten these potty people with another project in mind. I plan to use the framed negative, leaving the actual shapes to work with. They come in 3 varying sizes, just right for depicting my girls of ranging ages. I chose to lay them side by side, over a hand made envelope from vellum paper.
Of course, lately, no layout of mine feels complete without floating bubbles and elements. I added these to include a few of the super fun sequin bits. I am quite happy with this layout, the colors are perfect for my three girly girls, and I feel that I got the best use out of the greatest flair button ever!

UWS products:
From the heart flair
Potty People
Sequin Confetti

Sunday, September 14, 2014

Destination Unknown {Giveaway}

Did you see our Destination Unknown SHEBANG kit??

it's similar to the Nature Walk kit released previously, only bigger!


It's such a great deal at $105 (shipping included domestic) for $130 worth of products! The complete collection from 7 Dots Studio and UmWowStudio comes with:

  • 1 sheet of Celestial double sided 12x12 paper
  • 1 sheet of Journey double sided 12x12 paper
  • 1 sheet of Night Sky double sided 12x12 paper 
  • 1 sheet of Travel Bag double sided 12x12 paper 
  • 1 sheet of Under the Stars double sided 12x12 paper 
  • 1 sheet of Walk the Plank double sided 12x12 paper
  • 1 sheet of 12x12 diecut tags
  • 1 sheet of 6x12 word stickers
  • 1 sheet of 6x12 diecut elements
  • 1 sheet of 6x12 sticker elements
  • 1 6x6 paper pad
  • 1 package of 6x6 sea life white chipboard pieces
  • 1 set of 4x6 inch clear stamps
  • 1 6x6 compass stencil
  • 1 6x6 line elements stencil 
  • 1 set of chipboard Coral pieces
  • 1 set of chipboard Explore Tags
  • 1 package of chipboard Fishy Confetti 
  • 1 chipboard Life Preserver 
  • 1 set of chipboard Mermaid Duo 
  • 1 set of chipboard Nautical Stars
  • 1 chipboard Netting Background 
  • 1 set of chipboard Sand Dollars
  • 1 chipboard Schooner 
  • 1 chipboard Sea Life Set
  • 1 piece of chipboard Seaweed
  • 1 set of chipboard Starfish
  • 1 Sea Birds Mask
  • 1 Netting Mask 
  • 1 set of Set Sail Flair
  • 1 set of Starry Night Flair
There are 4x6 stencils, 6x6 stencils, a 6x6 pad, tons of chipboard embellishments, stickers, diecuts, 12x12 sheets, stamps and more! 

PLUS each kit comes with a special one of a kind embellishment♥

>>>>>>>>>>
Want to WIN a Destination Unknown SHEBANG kit? Just repin THIS PIN HERE and be entered to win! 
<<<<<<<<<<

Don't want to chance it and just NEED to know you're getting SHEBANG for sure? Click here to purchase :) PRESALE PRICE ENDS 9/18/14

And if you'd like to see the entire collection designed by me (DeeDee Catron) visit my personal blog here.

visit us on instagram and facebook for more chances to win :) 1 winner from all 3.


Thursday, September 11, 2014

Red!

  Hello friends and bloggers,
 
Geraldine here tonight to share a layout......it's Thursday the 11th @ 10.30pm
here in Australia and it's almost time to call it a day, but before I do I'm here to share a
 'Nature Walk' layout featuring some gorgeous UmWowStudio chipboard inspired by 'Nature'.
 
'Red'
 

UmWowStudio Products used:
 
 
I had great fun getting really dirty colouring the chipboard with Lindy's Stamp Gang Sprays,
Crackle Paint, Smooch Inks and Silks.
 

Thanks for visiting the blog and hope to see you again soon. G!


Wednesday, September 10, 2014

my soul by Tusia Lech

Hello :)

I am a happy member of small group, that has a robin-round art-journal swap. Below pages were created by me in DeeDee's art-journal and they show "my soul".


You can find here some mess, because creative soul has to be a little bit messy :) There are nature elements, a unicorn, some butterflies and moths - everything, that is so close to me.


Colors chosen by me are blues, violets and pinks - my favourites!


Background was created on 7 Dots Studio paper using Gelatos, pencils, crayons. I have added also some stickers and paper elements from Nature Walk 7 Dots Studio collection and Illumination.


Because I love night sky, I have used UWS Layered Star chipboard.


Creating art-journal pages, that express ones soul and inner world is so liberating!


Stamps are VivaLasVegas and 7 Dots Studio Nature Walk.


I hope I encouraged you again to take your favorite stash and create something from your soul.
xxxx
Tusia Lech

I have used:
Layered Star chipboard

Tuesday, September 9, 2014

Using Chipboard to create Art Journal Pages

Hello and Happy Tuesday!  Tina here today with a way to use chipboard on your Art Journal Pages.

Often, when I am creating Art Journal pages, I like to use lots of mediums, such as paint, ink, and sprays.  Many of my pages receive their texture from using these mediums with stamps and stencils.  

I wanted more of a dimensional feel to this particular page, so I used chipboard to enhance my theme and message.  Chipboard is a great alternative to stamps and stencils and lets you create projects that are meant to be touched.


I 'built' the background of my Art Journal page with various sprays and paints, layering multiple colors for an interesting effect.  I wanted to incorporate circles into my page, so I also used the Circle Confetti Mask on the background.

To create texture and dimension, I adhered an entire package of DIY Printer Block Alphas.   I placed them randomly around the edge of my page, creating a border of alphas.  (prior to adhering the alphas to my page, I painted each with a thin coat of gesso)


I painted each letter with contrasting colors so they would stand out from the background. Using an old credit card, I 'painted' hash marks over the alphas.  In addition, I used the edge of various circular objects to create the circles around each letter. 


I typed my journaling quote and adhered it to my page and added a few doodles around the edge to make it complete.


Do you use chipboard on your Art Journal pages?  Please share your UmWowStudio projects with us.  We would LOVE to see your inspiring creations!

Thanks for stopping by!  Have a great day!