Showing posts with label wow embossing powder. Show all posts

Friday, April 6, 2018

Blessed are the curious

Hello everyone,

I have a tag to share today. I have heat embossed the butterfly chipboard and filmed the process so I don't have to explain ! lol


As a base a used a piece of design paper. I added some stamping, scribbling, a little gesso and embossing. 


The butterfly is placed on some silk sari ribbon which I have stitched down the sides. 

You will find the Butterfly HERE.


I am trying to use up my old stash of bits and bobs, these paper flowers are of that stash so I added a brad from the same stash and glued the whole thing down onto the tag...


I think it turned out nice, now if you like to know what I did to the chipboard then hop over to YouTube and have a look ! 


I hope you enjoy watching. 

Until next time ! 


Wednesday, December 13, 2017

Merry - bright

Hello everyone,

Today I have a trio of rusty ATC's for you. I made them a little shabby too as I thought it went well with the rusty backgrounds...


And here's how I made these... 


I used embossing powders on the chipboards. I used brass on the Elk's head and the stars, Red & Sparkly on the little circle that wasn't really a chipboard but a loose piece from inside a chipboard that fell out and I used for his nose.


Here is how that looks. 


Next I added some shading with my Big Brush Pens... 


Looks a bit more interesting like this I think. 


The paper was made with acrylic paint in 'iron' and it was made rusty with a patina spray.. I added some embossing and made sure it looked a little shabby... I also added some sari ribbon and some embroidery twine. 


On this card I also added the sari ribbon and embroidery twine and like on the other two a little doodling with a gold pen around the edges. 


This one got the same treatment too ! 


Here is another look at all three... 

I have used the following Chipboards:


Thank you so much for stopping by today ! 


Friday, April 14, 2017

There is beauty in simplicity

Hello everyone,

and welcome to my blogpost ! I have made a tag and I have filmed the process so sit back and enjoy ! 
Here's the tag :


I have used the following Chipboard :


You'll find it HERE.


Thank you for stopping by today ! 


Friday, September 9, 2016

XOXO

XOXO

Hello everyone, 


Today, for my Creative Team post I had a bit of fun with a mini canvas. 

I'll try and explain how I made this.


First I took some of the 'Love Confetti' hearts and painted them pink (what else ?) I then heat embossed them with a clear holographic (glittery) embossing powder. 


Next I chose my image, which is a stamp from VivaLasVegaStamps! and I coloured it with Copic Markers. 


I then took a little canvas (approx. 4"x4") and painted it with 2 shades of acrylic paints. After it dried I stamped a chevron stamp repeatedly around the edge of the canvas, coloured in the chevrons with a black Copic Marker and then filled in the gaps in between with a white paint marker. 


I also added some more stamping to the front. All stamps are from VivaLasVegaStamps! The white swirls are heat embossed with white embossing powder. I did end up using the canvas upside down as I like it better that way !


Here is the finished project ! 

I also painted two 'X's' and two 'O's' but I used red paint and then embossed them the same as the hearts.. Then I put everything together using gel medium to glue everything down. 


Sideview hanging on my wall... 


A close up of the chipboards... 


I used the 'Love Confetti' for this :


Thank you so much for stopping by today !!! 


Thursday, July 28, 2016

Wonderland

Hello everyone,

For today's Creative Team post I have made a postcard.


This was so much fun to make ! 
I used a gelli printed background and added just one stamp at the bottom as 'ground' to put my scene one. I then added black lines and stitching around the edges of the card and wrapped some twine around it. 
Next I started on the chip boards. The stars were heat embossed with a light yellow embossing powder by Lindy's Stampgang. The stem of the flower was coloured with Copic Markers. The flower head was white embossed and then coloured over the top, partly with Copics partly with Faber Castell Big Brush Markers. The whole think was then clear embossed. 
The little rabbits were painted with gesso and then coloured with coloured pencils. Aren't they cute....
I arranged everything on the card until I was happy and then glued everything down. 
Lastly I stamped the word 'Wonderland' on a piece of paper and stapled it to the card.
That was it ! 

I used the following chipboards:


All stamps I used are by VivaLasVegaStamps!

Thank you so much for stopping by !  


Friday, July 1, 2016

Biohazard


Good morning friends! We have some exciting things happening at UmWowStudio.. the first is that we'll be having a little Creative Team CHANGE >> Introducing CORRIE HERRIMAN! She is super talented and I've come across her work via the Viva Las VegaStamps! blog. I'm excited to have her here with her fabulous style. She's up today with her first post: 


Corrie's Blog


----------------------------------------------------------------------------------------------


Hello everyone,

I was so happy when I was invited to join the Creative Team for the lovely DeeDee Catron's
Their chipboards are fabulous and so much fun to use with rubber stamps !   For my first post I have created an art journal page:


I started with a piece of manilla card stock and painted a layer of gesso on it. After that dried I painted over the gesso with some Silks. I used a blue and a green. It gives a lovely shimmer. 
Because I thought it was not dark enough I used Distress Crayons over the top and sealed them with Distress Collage Medium, which is just gel medium I think. It makes the crayons go streaky which I liked. Next I used a Prima Marketing 'Finnabair' stencil called 'Bubbles' to create, well, the bubbles... lol. I used white paint and a blending tool for this.
I then used some VivaLasVegaStamps! to stamp the background and add some more interest. I used several colours of Archival Inks for this, always making sure they blend in. 
The jar, jar label and sentiment are also rubber stamps by Viva Las VegaStamps!
The chipboards I were painted with gesso and coloured with Distress Crayons. I heat embossed both to add interest but also to make the Crayons permanent. I used a holographic powder for the fish and a clear powder for the seaweed. 
After colouring everything I arranged it on the background until I was happy and glued everything down. Lastly I used a small piece of 7Dots Studio pattern paper (Destination Unknown by DeeDee Catron) at the bottom to make the sand at the bottom of the sea. 

I have used these chipboard pieces:


Thank you so much for stopping by today ! 


Friday, July 3, 2015

Be WOWed -- WOW Embossing Powder and UmWowStudio -- Home Decor

We're onto another beautiful project featuring WOW Embossing Powder and UmWowStudio! 


Find WOW Embossing Power : 

Find UmWowStudio:
 
WOW! Embossing Powder makes such a great addition to the UWS product line! It can be used with our stencils and masks, behind our chipboard, on our chipboard, with a stamp and more.

For today's project I, DeeDee and UWS Owner and Creative Director, bring you my own project!


I have utilized the Alpha 2, Sketchy Cloud MASH and Rainy Day Confetti chipboard pieces from UmWowStudio. The Alpha 2s have been covered in a delicious opaque white powder from WOW. I love how the white is so bright but the letters are outlined by their ashy edge. What a delicious combo!

Visit me at my blog for more details :)

Leave comments on all the blogs participating -- we're giving away an UmWowStudio and WOW Embossing Powder prize package.

Thursday, July 2, 2015

Be WOWed -- Wow EP and UmWowStudio -- 12x12

We're onto another beautiful project featuring WOW Embossing Powder and UmWowStudio!


Find WOW Embossing Power : 

Find UmWowStudio:
 
 
WOW! Embossing Powder makes such a great addition to the UWS product line! It can be used with our stencils and masks, behind our chipboard, on our chipboard, with a stamp and more.
Today's project is brought to you by the bright and beautiful Sindi Jeffers.


She's used our Layered Clouds and Clear Sparkle, Easter Sparkle, Princess Pink and Metallic Brass sparkle from WOW Embossing Powder. I love the use of powder directly on our Chip. It really gives it some OOMPH! And paired with those delicious patterned papers... YUM!

You can get more details on Sindi's blog here.

Leave comments on all the blogs participating -- we're giving away an UmWowStudio and WOW Embossing Powder prize package.

Wednesday, July 1, 2015

Be WOWed -- Wow EP and UmWowStudio

We're onto another beautiful project featuring WOW Embossing Powder and UmWowStudio!


Find WOW Embossing Power : 

Find UmWowStudio:
WOW! Embossing Powder makes such a great addition to the UWS product line! It can be used with our stencils and masks, behind our chipboard, on our chipboard, with a stamp and more.

Today's project is brought to you by the talented Ladybird Ladybird. 

Ladybird has used WOW embossing powder with an embossing folder (she used Versamark ink when dry embossing and then applied the powder).


She specifically used Metallic Gold Sparkle WOW embossing powder, UWS Explore Tags and
UWS LOVE Tabs. I really adore the use of the double embossing and how the gold is such a delicious touch of goodness to the kraft colored chip. Stop by Ladybird Ladybird's blog for more details.

Leave comments on all the blogs participating -- we're giving away an UmWowStudio and WOW Embossing Powder prize package.

Monday, June 29, 2015

Be WOWed -- Wow EP and UmWowStudio ♥

Wowee Wowzers WOW!

We are WOWing you with a little swap/hop between WOW embossing Powder and UmWowStudio.


Find WOW Embossing Power : 

Find UmWowStudio:

WOW! Embossing Powder makes such a great addition to the UWS product line! It can be used with our stencils and masks, behind our chipboard, on our chipboard, with a stamp and more. This week we are starting off with a beautiful project from Tusia Lech! 


She has used our Conversation Hearts, Mustard 29 Flair, and Swiss Dot Stencil. She's also given you a sneak peek at a new product coming to UmWowStudio next week! Can you spot it? The embossing powder she chose to use turned out so beautifully! They are : WS14R Cheer Gold Highlight and WS38R Amber Rose.

Leave comments on all the blogs participating -- we're giving away an UmWowStudio and WOW Embossing Powder prize package. 

Tuesday, June 9, 2015

#happy #together by Tusia Lech


I created a layout with my sweet, little son. At the background you can see lettering made with black Pitt Pen and UmWowStudio Stencil Letters & Numbers Mask Kit.


Chipboard pieces were covered with great WowEmbossing powders - Earthtone Honey and White Puff.


UmWowStudio supplies:
Stencil Letters & Numbers Mask Kit
Layered Butterflies
Celebrate Hashtag Banners
Family Hashtag Banners
Mustard 29 flair

WowEmbossing powders:
Earthtone Honey
White Puff.

Other supplies:
7 Dots Studio - Cold Country
7 Dots Studio - All I Ever - 12x12 Stickers
7 Dots Studio - Elise Rebel - 12x12 Stickers
Finnabair - Glass Beads
Faber-Castell - Artist Pitt Pen
Black Indian Ink
Acrylic Dots

Wednesday, October 22, 2014

Blam, Zap, Boom!!! A Layout with Jen Matott

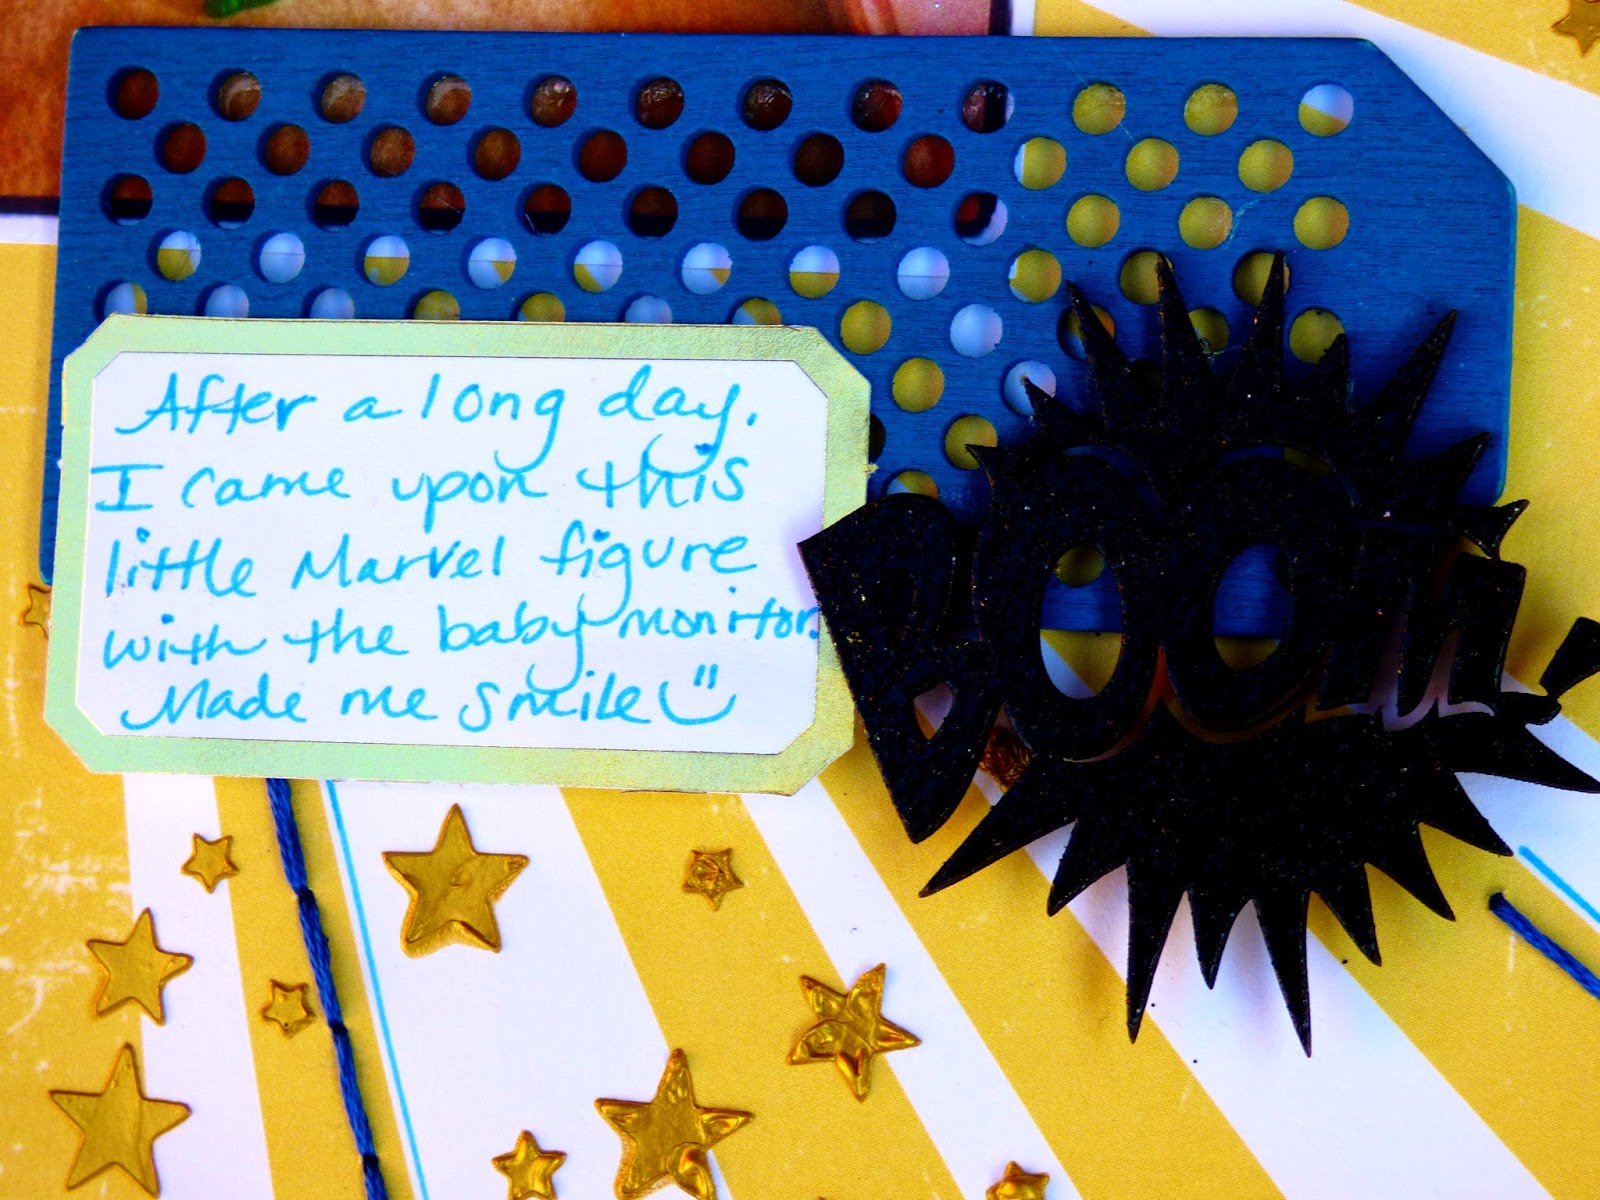
When my youngest was still a little one in a crib, I had a baby monitor that I kept in the kitchen so I could hear when he was up from his nap.  My other, then 6 year old, son loved Marvel figurines and I'd find them all over the house in odd locations.  The funniest was this one seemingly muscular little dude trying to lift the monitor (or so it looks like)... It made me giggle one afternoon and I had to grab my camera!
 The Comic Book Speech Bubbles Chip is perfect for little boy pages!  I adore them for their Pop Art appeal and super hero flavor!  I had to spice them up with some metallic embossing powders from WOW Embossing powders. 
 Then, I added some colored paper shapes behind them and popped up a few of them!  This is a little bit different than my usual style but these shapes inspired me to create a more Pop Art style page... I was thinking along the lines of Roy Lichtenstein like this artwork:
http://nikkiikkin.files.wordpress.com/2013/03/il_fullxfull-230754249.jpg
Lichtenstein was a Pop Artist in the 1960's and his work mimicked the Comic books or ads of the time.  His signature BenDay dots and bold primary colors had the art world in an uproar!  I love the bold, retro look to the work!

  I also used the Star confetti mask to add a few stars with gold texture paste. I just used a small palette knife to get some of the stars .   I stitched on the lines to give a little more color.

 If you have little boys or a love of Comic Book icons, these chipboard accents are for you!  Thanks for letting me share this page with you today!

Supplies:
UmWow Studio Comic Book Speech Bubbles Chip
UmWow Studio Star confetti mask
Studio Calico paper and tag accent
American Crafts cardstock
DMC floss
Epoxy dots
Gold Texture Paste (not sure of brand)
 WOW Embossing Powders in Gold Metallic, Black Glint, Metallic Silver Sparkle