Showing posts with label Glass bead glitter gel. Show all posts

Friday, September 30, 2016

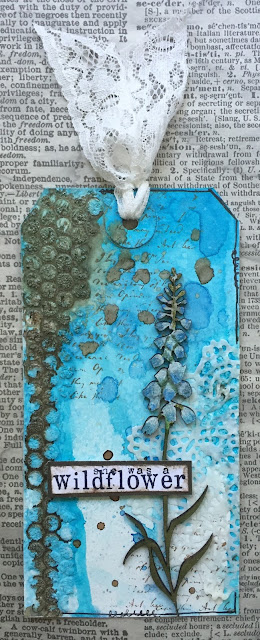
She was a wildflower.

Hello everyone, 

and welcome to today's Creative Team post. 


For today's post I have created a tag :


I will try and explain how I made this...

First, on a gessoed tag, I applied Golden's Glass Bead Gel through some sequin waste. 
This is what that looks like :


I then added some spray inks. I used Lindy's Stampgang Sprays. 


Next I added a doily. 


It just adds a little subtle detail I think. I also added some background stamping. I used a little script stamp by VivaLasVegaStamps!

Next I started to work on the chipboard:


I used a green Copic marker to colour the stem and added some gesso to the flowers. I then added some colour with coloured pencils. 


Next I put the whole thing together:


I also added some doodling around the edge and also added a sentiment. I stamped it on white card stock, inked the edges and matted it on a piece of brown pattern paper. I then adhered it to the tag with dimensional tape.  Lastly I added some lacey ribbon. 


Here are some close-ups... 


 I hope I have inspired you to dust off those chipboards and start using them.. they are so versatile..

I have used only one today :


You'll find it HERE.

Floral set, I used the bluebell. 


Thank you so much for stopping by today ! 


Wednesday, February 4, 2015

Dream a Little Dream Visual Journal Page with Jen Matott

Hi UmWow Studio fans!  I'm here to share a little tutorial on how to create with lots of fun textures and use UmWow Studio Mask/Stencils!  This visual journal page was done with the UmWowStudio Star Confetti Mask , Circle Confetti Mask, and Cicada Mask.  

 I used a Unity Stamp set that had a stitched look.  I added stars with the UmWow Studio Star Confetti Mask, Faber-Castell Design Memory Craft Iced Chai Gelato® from the Steampunk color set, and Faber-Castell Design Memory Craft Glass Bead Glitter Gel through the mask!   To apply the Gelato® color through the stencil, use a foam applicator to pick up some of the color from a non-stick craft mat.  Rub through the stencil in a circular motion.  It creates a soft effect.  I added a bit more through the Circle Confetti Mask in different colors.  
 Then, I used a palette knife to apply the Glass Bead Glitter Gel through the stencil and allowed it to dry.  You will know it's dry because it turns from white to clear in color.  Some dripped, watered-down Gelato® was added for more shimmer.
 I used a Faber-Castell Design Memory Craft PITT Artist pen in a small tip to draw through the Cicada Mask!  I love this winged beauty!  I added a bit more scribble to it for interest. 
 Faber-Castell Design Memory Craft introduced a new product at CHA and it is gorgeous on the UmWow Studio chip!  Texture Lux can be brushed on or built up with texture tools.  I just brushed it on in silver and gold on some UmWow Studio Star Confetti and Layered Star Chip.
 Some Crate Paper rub ons were added and the Layered Star Chip was added last. I love working in layers in my journals.  Simple shapes can become very complex and show depth with lots of layers.
 The theme of the page was Dreams and I wanted it to look sparkly and whimsical! Lots of layers create texture and a fun page!
 I hope you enjoyed this little tutorial on how I created this page!  Thanks for visiting today!

Material List:
UmWowStudio Star Confetti Mask , Circle Confetti Mask, and Cicada Mask
UmWow Studio Star Layered Chipboard
UmWow Studio Star Confetti Chip
Faber-Castell Design Memory Craft Iced Chai Gelato® from the Steampunk color set ,
Margarita Mix, and Metallic Melon
Faber-Castell Design Memory Craft Glass Bead Glitter Gel
Faber-Castell Design Memory Craft Texture Luxe in Silver and Gold
Faber-Castell Design Memory Craft PITT Artist Pen in small black
Faber-Castell Design Memory Craft Stamper's Big Brush Pen in Black
Crate Paper Notes & Things Collection rub-ons