Showing posts with label layered clouds. Show all posts

Monday, February 19, 2018

Mysterious

Hello everyone,

and welcome to my post for today ! I have made a tag :


I used the 'Wooden Sign' Chipboard

and also one of the 'Layered Clouds'


This is what I did to the 'Wooden Sign': (unfortunately I forgot to take photos what I did to the cloud, it was an afterthought,  I applied 2 layers of embossing powder).


This is what it looks like in its natural form.. 


I started with 2 layers of white gesso. 


I added colour with my Big Brush Markers by Faber Castell. 


This is what it looked like when I finished. 


Next I stamped it with the words: "she was" and "mysterious". 


Here's the cloud I heat embossed it with a coat of dark blue embossing powder first and then went over the top with a light blue with gold flecks in it. I like that you still can see the dark blue here and there. 


A close up. All stamps I used are by VivaLasVegaStamps! The background was painted with PaperArtsy Acrylic paints. 


And here she is again ! 

Thank you so much for stopping by today !


Thursday, October 12, 2017

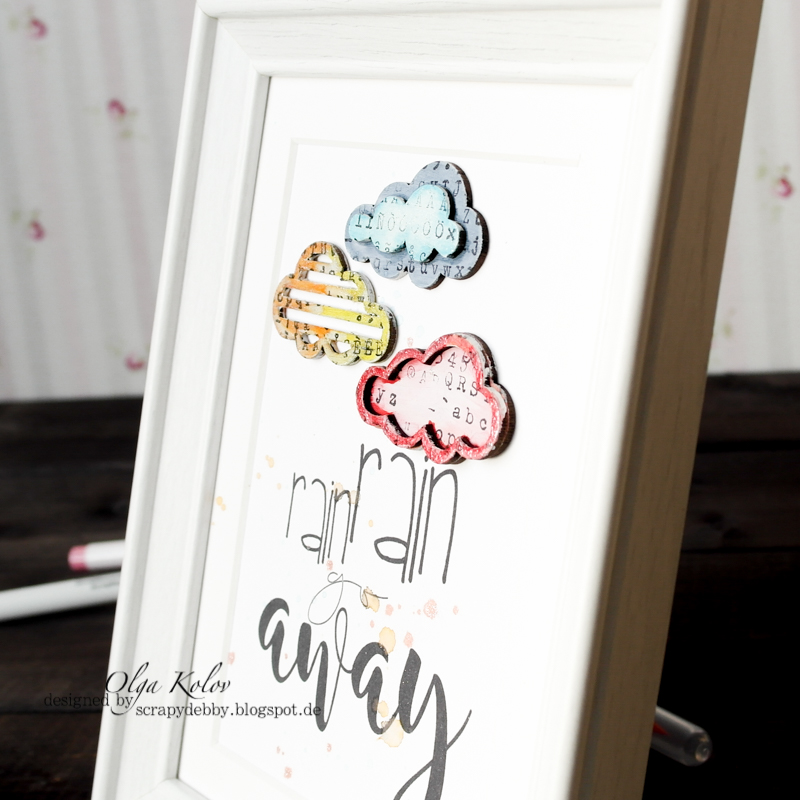
Rain Rain Go Away

Hello friends of UWS

Today I want to show you using UWS chipboards for child room ;)

I have covered the clouds with white gesso, stamped and colored with watercolor pens. Funny fonts on the computer, printed, glued on the clouds... DONE! ;) Check it out!!


Stay creative!

Supplies I used:

Layered Clouds


Thursday, July 2, 2015

Be WOWed -- Wow EP and UmWowStudio -- 12x12

We're onto another beautiful project featuring WOW Embossing Powder and UmWowStudio!


Find WOW Embossing Power : 

Find UmWowStudio:
 
 
WOW! Embossing Powder makes such a great addition to the UWS product line! It can be used with our stencils and masks, behind our chipboard, on our chipboard, with a stamp and more.
Today's project is brought to you by the bright and beautiful Sindi Jeffers.


She's used our Layered Clouds and Clear Sparkle, Easter Sparkle, Princess Pink and Metallic Brass sparkle from WOW Embossing Powder. I love the use of powder directly on our Chip. It really gives it some OOMPH! And paired with those delicious patterned papers... YUM!

You can get more details on Sindi's blog here.

Leave comments on all the blogs participating -- we're giving away an UmWowStudio and WOW Embossing Powder prize package.

Wednesday, June 24, 2015

Who'll Stop the Rain? By Sindi Jeffers

Hi everyone! I’m just stopping by to share a quick tutorial and layout. I have had so much since joining this team. I’ve loved playing with the chipboard and I’ve learned lots of new ways to alter it. For this layout, I used a super simple technique to alter a few pieces. Although it was simple, I love the effect it created.


This layout was inspired after we went to a Cincinatti Reds game last week. I must have checked the weather a billion times, and I swear I didn’t see rain coming from anywhere. Of course, we wound up sitting through an hour-long rain delay. Just my luck! I wanted the clouds and rain drops on this layout to have a watery look. Here’s how I achieved that:

First, I covered my chipboard with a layer of white gesso.


Next, I covered the chipboard with blue india ink. I like to cover it with ink and then dab with a paper towel before it dries. It gives it a texturized look.


The next step is to drip a bit of white paint on there. I used white acrylic paint that I thinned down with some water. I just sort of slung it on there.


Super easy!


UmWowStudio Products Used:

Friday, May 8, 2015

Going Down by Sindi Jeffers

Hi everyone! I'm just stopping by to share this layout that I created with my UmWowStudio and 7 Dots Studio goodies!
I was so excited when I got my package of clouds and couldn't wait to tear them open. I just love those little things! I just covered the clouds in a layer of white gesso and added some white paint before backing them with patterened paper from the 7 Dots Studio Destination Unknown collection. I did the same thing with the layered arrow and tab.


UmWowStudio Supplies: 

7 Dots Studio Supplies: 

Tuesday, October 7, 2014

Feeling Blue Journal Page with Jen

P1020406
I have an art journal page to share with you today!  I used lots of Faber-Castell Design Memory Craft mediums and Gelatos® colors along with a few of the adorable Layered Chipboard clouds.  Unfortunately, I was so into making this page, I forgot to take too many in progress photos! 
P1010830I started with Faber-Castell Design Memory Craft Whipped Spackle and used a palette knife from our Gelatos Tool Set to smear some around to create "clouds".  It keeps it's shape and won't flatten down after drying.  I also love the resist that it gives to wet media.
When that was dry, I added Gelatos® colors in Blueberry, Metallic Blueberry , Bosenberry and  Double Scoop® Snow Cone to the page. I had made a Gelatos® mist with the Metallic Blueberry and Bosenberry to create a shimmer and an even application.
P1020400The other colors were added to the top of the page and water was added with a brush to allow drippage (my favorite technique)! I love how the Whipped Spackle allows the color to puddle and change over it.  When that was dry, I added stamped letters using a Stamper's Big Brush Pen in Cool Grey
P1020402 Finally, I added the UmWowStudio layered chipboard clouds and filled or covered them with the Faber-Castell Design Memory Craft Glass Bead Glitter Gel.  It gives them the right amount of sparkle and shine!  When dry, it allows the color underneath to show through too!  I love these layered chipboard pieces with their open spaces to fill with fun mediums!
The quote I used for this page was one from a 7 year old!  I found it online and it was perfect for this page! That 7 year old was so wise.  It says:
"If you are feeling blue,
try painting yourself a different color!"
P1020405
I love that I can use ALL of my Gelatos® colors any time I want!!!  It just depends on my mood! 
What color are you feeling lately?

Materials List:
Rotary Stamp: Stamping Up!
Bling: Prima Marketing

Monday, August 4, 2014

Happy Birthday Tag with Jen

Hi artsy friends!  Today is a fantastic day here in my neck of the woods and it is my 40th birthday!!  So, for my project, I made a birthday tag to share with you all...  I have many friends that have birthdays in August too.  Every birthday is a time to celebrate! 

"Make a Wish Tag"
 I got my hands on some of the brand new UmWowStudio Sequin Confetti and knew I had to do something fun with them! I love the color of UmWowStudio's chipboard so I didn't want to color them but I did mix them with bright colored plastic sequins too.  I also turned one of the Layered  Clouds into a cupcake top!  The Make a Wish Pocket Chip was perfect for this tag with it's adorable size and punched out words and chevron. 
 I did color the background tag with Faber-Castell Design Memory Craft Gelatos® in Mango, Bubble Gum, Tangerine, Lemon, Raspberry, Blueberry, Lime, Snow Cone, Gold Champagne, and Iced Chai. 
Using Faber-Castell Design Memory Crafts Textural Accents Whipped Spackle, I put it through a Circle Confetti Stencil to create depth and texture.   Those drips and splatters made it even more of a celebration!  I did paint the Make a Wish Pocket Chip with watered down Gesso before splattering with cool colored Gelatos.
 The cupcake wrapper was stamped on patterned paper and the Layered Cloud was covered with WOW Embossing powder in Vodka Sparkle. 
 A flair button was added too for another circle accent along with the confetti and doily.
I finished the tag off with ribbon and some Chevron Confetti.  This is a festive way to adorn a gift, bottle of wine or attached to some flowers! 

UmWowStudio Products:
 Sequin Confetti
 Layered  Clouds 
 Make a Wish Pocket Chip
 Chevron Confetti
 Circle Confetti Stencil

Other materials:  Faber-Castell Design Memory Crafts Textural Accents Whipped Spackle & Gesso, Faber-Castell Design Memory Craft Gelatos® in Mango, Bubble Gum, Tangerine, Lemon, Raspberry, Blueberry, Lime, Snow Cone, Gold Champagne, and Iced Chai, WOW Embossing Powder in Vodka Sparkle, Tim Holtz tag, doily, Studio Calico confetti, aMuse patterned paper, Close to My Heart birthday stamps.

Thursday, July 10, 2014

My Secret Story with Rhonda

Thursday greetings to you!  It's Rhonda here today with my very first post for UmWow Studio.


I was inspired by the Hexagon Background for my page. To begin, I coated it in clear gesso and then misted it with some Moon Shadow Mist, then sprinkled it randomly while wet with Pepper embossing Powder and applied heat to activate the embossing.

Once it dried completely, I flipped it over and used it as a mask to mist onto my background paper. I used TiffanyLou Blue and then set aside to dry.


I selected the Mini Polaroid with a heart relief and colored it with Whale Watch Blue. The heart was later colored in with a Blue Metallic artist pen. The Layered Clouds were misted with Splash Chalkboard mist and Whale Watch Blue. Once dry, I added some Glossy Accents to the layered cloud on the right.


Additional embellishments of enamel dots and sequins helped finish the page. The star theme of my "Life is Good" flair is one of my favorite elements on the page. 

UmWow Studio Supplies:
Hexagon Background
Miniature Polaroids
Layered Clouds
Life Is Good Flair

Other Supplies:
Cold Country Papers, Die Cuts and Stickers by 7 Dots Studio
Earthtone Pepper embossing powder by Suzy West for WOW
Tiny Attacher by Ranger
Pitt Artist Pen in Blue Metallic by Faber Castell
Moon Shadow by Lindy's Stamp Gang
Whale Watch Blue Starburst by Lindy's Stamp Gang
TiffanyLou Blue Starburst by Lindy's Stamp Gang
Splash Chalkboard Glimmer Mist by Tattered Angels
White Color Shine by Heidi Swapp
Swimming Pool and Silver Sprinkles Enamel Dots by Doodlebug
Fairy Dust Glitter by Donna Salazar
Glossy Accents by Ranger
Gems by Want2Scrap
Horizon Fishtail Banner dies by Cheery Lynn Designs
Vagabond by Sizzix
Other: Sewing Machine and Thread, Cheesecloth and Sequins

p.s.  Don't forget about our new sketch challenge for July.  You can check out all the details here.

Saturday, February 22, 2014

Winner!! Sketch Challenge

Hello!! Today I'd like to share with you our JANUARY Sketch Challenge WINNER!! (a little late, I'm sorry!)


Our winner is CHANNA!!! Girl please email me @ deedee@umwowstudio.com with your shipping address and we'll get you some goods in the mail!!

I really love how she used our Layered Clouds on this page. Coloring them AND adding the black outline. SUPERB> Not to mention the colored ones on top of a kraft one. Just yum. Thanks so much for playing everyone!! Don't forget to play in our CURRENT sketch challenge!

Thursday, August 29, 2013

Don't Let Anyone Ever Dull your SPARKLE!

I wanted to share this tag on the UmWowStudio blog as well as over @ Viva Las VegaStamps! (there's a video there on creating the colored dress for the Dancing Lady!)


this beauty has a little extra meaning and will be making its appearance at someone's door step any time soon!! ♥♥ 

Wednesday, August 7, 2013

Make A Wish {12x12 by Kylie Drake}

It's Creative Team Wednesday and I've got Kylie stopping by today with her totally knockout style!


Kylie says "UmWowStudio chipboard lends itself so well to Fall pictures and I have a stack of family pics from last year that I need to scrap. I wanted to use my embellishments to highlight my sister's relationship with her son and I think the Make-a-Wish flair and the combination of the Heart Hands and layered chip do this wonderfully. I love using embellishments to tell a story. 


Maya Rd kraft envelope, Cosmo Cricket Tiny Type stickers, gloosy accents, Bazzil cardstock, American Crafts and Kaisercraft papers."

I don't think I can say enough how proud I am of the creative team --- each and every week I'm so pumped to share their work, and it's all SO DIFFERENT! Kylie's style has always been so graphically stunning. I'm honored to share her work using our chipboard :) Leave her some love!!

Friday, July 12, 2013

The Sky's The Limit {May Arts & Lawn Fawn Hop}

Hello everyone!!! Welcome to my stop on the last day of the May Arts | Lawn Fawn blog hop!!


Have you been checking in this week to see all the goodness? Check the May Arts blog for a full list of this week's participants! Today my Ribbonista in crime is Charlene, so be sure to stop and see her project, too!

I've put together a steadfast little card perfect for some encouragement to a friend, a recent grad, or maybe the little girl down the street :)


I've used the Dewey Decimal 6x6 paper pad and Sky's the limit stamp set from Lawn Fawn. The stamp was stamped on white cardstock in archival ink, and on the sheet of rotating tan and orange apples. I fussy cut three of the five balloon sections and the bottom balloon ring, then glued them on the white stamp in their appropriate places.


I layered some UmWowStudio layered clouds chipboard, half pearls and ouchless cardboard from Gauche Alchemy on a card base. As a final touch I grabbed a strip of the White Horizontal Satin Strip 410 series in 3/4 inch. I clipped the edges and tied it in a knot, then glued it on!

The inside of the card reads "The Sky's the limit" and is ready for some personalization!

Don't forget....
...there are TWO giveaways!! Each contains the same thing.. .3 Spools of May Arts Ribbons ribbon, and 1 stamp and die set from Lawn Fawn. Just leave comments on all the participants through the week, and during the weekend be sure to stop by the May Arts FB page, and the Lawn Fawn FB page to say hello!