Showing posts with label resin. Show all posts

Thursday, November 15, 2012

Thankful Tag

Today my THANKFUL tag aired on the Globecraft & Piccolo blog.


There's a How-to, more photos and a video on distressing small chipboard pieces on the G&P blog - check it out!
Supplies used:
Walnut Stain, Vintage Photo, Dried Marigold, and Mustard Seed distress inks by Ranger, a paper clip, baker's twine, wooden alphas by Pink Paislee, TH die by Sizzix, martha stewart punch.

Sunday, September 9, 2012

It's here.. IT'S HERE!! MOSSY GLEN!!!

I can't wait to dig in and use this kit, I've already got a beautiful little card planned to share later this evening :D

Anyways.. check out Mossy Glen in its full reveal:


In the main kit you get:
One large flower in brown and green
One small peony in brown
One small daisy in soft yellow
One small daisy in green
One ribbon flower with pearl center and faux suede leaves
Three suede leaves
Two flower spread die cuts in kraft
Two hat pins; one six inch, one smaller
A set of paper butterflies; one large, one medium, three small
Two wrapped miniature torches
Two beaded clouds with three raindrops
One yard of crumpled snow white seam binding
One ribbon slide
One paper doily
One resin mushroom
Two kraft pennant style tags
Two miniature white tags (super small, look close!)
and Two medium sized embossed tags; retro circles and damask


And here is the Add on Resin Kit:


From left to right:
One large mushroom
One mossy rock
One cattail 
One wooden log
One mushroom bunch

Here are you shopping cart buttons!
As always the main kit is $18 with $3 shipping for US, $5 shipping for Canada and $6 shipping for the rest of the world, the add on resin kit is $10 no extra shipping.

--RETIRED--


Aaaaaaand... let me know what you think of the kit! :D

Saturday, September 1, 2012

Inspiration : Mossy Glen

Each month I like the kit club more and more...

Thinks trees, clouds, browns, greens, hints of yellow, blue and white :) 

Oh Mossy Glen.... you had me at M!! ♥♥


I made the collage but not all the photos did I take
photo source: - | - | - | - | - | - | -

Saturday, August 18, 2012

Altered Spoon Blog Hop!!

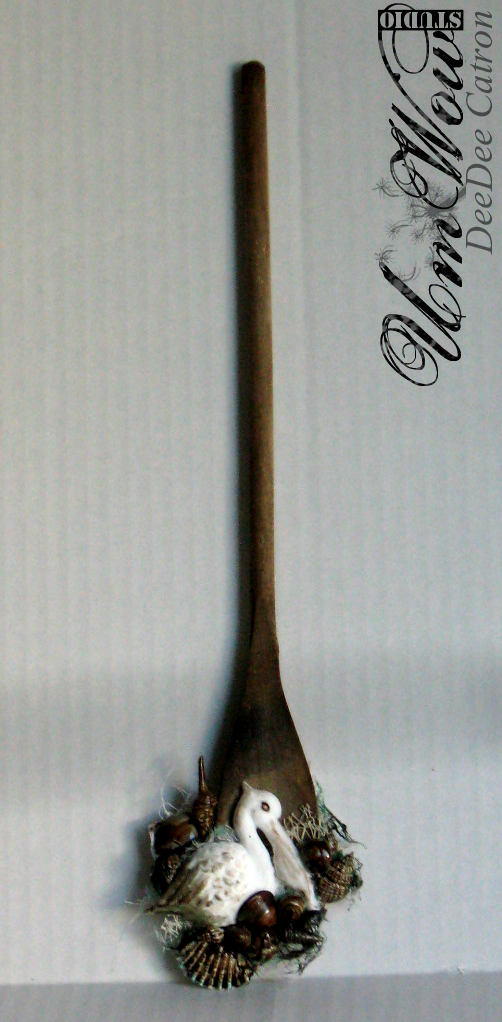
I was so super honored to be asked specifically by Susan to help her celebrate her blog-versary... I chose to go nautical with my spoon.


First I started off by aging the spoon with a solution of vinegar and steal wool. Put the steal wool in a jar of vinegar and allow it 24 hours to "cure". Then brush the vinegar mixture over your spoon.


To finish off the spoon I used UmWowStudio's August handmade embellishment kit "Beach Combing" as well as the add on kit All Resin All The Time. Other products include a netting ribbon by May Arts to simulate a fishing net, cheese cloth, Tattered Angels glimmer glaze in Waterfall and Coconut Shell, Helmar's quick dry adhesive, and collected shells from the beach!


In this last photo you can really see the dimension and beauty that the spoon has.
For a quick tutorial on altering the resin piece visit the Amazing Mold Putty blog. :) 
------
Presenting the artistes de spoon...

Friday, August 17, 2012

Using the August Kit!

Tomorrow I'll be joining in a SPOON ALTERING blog hop to celebrate a super close friend's Blog-versary:

so stay tuned to see how I used this month's kit and add on to alter my spoon!!!

Tuesday, August 7, 2012

Beach Combing REVEAL!!!

 Alright alright.. here it is. Beach Combing!!

Here is the main kit:

It includes:
1 6 inch weathered wood fence
1 hanging beach sign
2 weathered wood clothespins
3 distressed patterned paper clothespins
3 patterned paper flags
1 bundle of driftwood
1 ragged muslin flower with box pleat and pearl center
1 vintage lace flower with pearl center
12 inches of rustic baker's twine
1 message in a bottle
3 weed silhouettes in cream cardstock.. mist 'em, use 'em as a mask, ink 'em... do what you will!
and a scatter of authentic shells.


 I've decided to introduce an add on kit! Each month's kit will consist of theme appropriate resin pieces. This month's includes an anchor, two pelicans and some harbor dock poles.. complete with rope and a netting throw. Each add on kit will be completely voluntary, will be $10 and will have free shipping as it'll just go in the same box as your regular kit. :) - If you love the add on kit.. buy it! It is worth way more than the $10 you get it for :) it'll go in my etsy for closer to $15


Here are you buy now buttons.. the first one is for US Shipping for the main kit, the 2nd is Canadian shipping, the 3rd is international shipping and the 4th is the add on.


--RETIRED--

Thursday, July 19, 2012

Something I'm working on...

First off I just noticed...... THIS: 39999 pageviews

WOW WOW WOW..

Thank you all! Thank you for your sweet comments, and encouragement, your continued reading and your support :) 

I recently had a request for some resin clouds.. and as I've been pulling them out of the mold I couldn't help but mess around with a couple... check this out:


available in the etsy shop this weekend :)


Tuesday, July 17, 2012

Full Reveal of the WOW Piece (AT CHAAAAAAAAAA!)

I just saw THIS POST showing WOW's CHA booth! CAN YOU SPOT THE PIECE?!?


I'm not even on their DT.. or really affiliated.. I'm just so GIDDY about having projects @ CHA, again!!


Products used: WOW embossing powder, Bobunny vintage double dot, kraft paper, Basically Bare oh so minis, pennant pieces and fanciful frames 2, Tattered Angels glimmer mist and glimmer glaze, half pearls, UmWowStudio resin owl, UmWowStudio Peony, UmWowStudio July Kit floral spray, gesso, baker's twine, various glues


Friday, July 6, 2012

Kit Reveal!!


Introducing.. AROUND THE WORLD!

Here is my limited edition July 2012 handmade embellishment kit

You get:
One distressed vintage map tag
One untouched ivory shipping tag
One hand twirled vine with glittery leaves
Two lime green bobunny double dot vintage roses
One bobunny double dot leaf
One miniature kraft leaf
One 16 inch longitude/latitude banner/bunting
One 8 inch vintage map bunting/banner
One kraft weathered clock die with hands
One cast Globe resin piece
One cast Ship resin piece
One wood burned map square
One layered paper and chipboard hot air balloon
Three vintage sewing pattern flowers with cast resin buttons

All materials used are acid free so preserving your memories is easy!

Shipping is $3 to the US, $5 to Canada and $6 anywhere else ♥


--RETIRED--

Wellllll... is it what you were expecting?? :) 

Thursday, July 5, 2012

Around the World Sneak #3


Each kit has one set of these cute little resin pieces..  a globe and a ship for all your traveling needs =) 

Wednesday, July 4, 2012

Around The World Sneak #2

umm YES PLEASE!!


Each kit comes with one full set, one large, one medium and one small vintage pattern paper with resin buttons in turquoise and white :) And if you need extra, they're also listed in my etsy shop :) 


Tuesday, June 5, 2012

Summer Lovin' - REVEAL

I want you to know.. I had originally intended to do six days of sneak peeks.. but have revised my plan ;) I also now have TEN kits waiting to be ordered.. rather than making them all as the orders come in. You live and you learn and I thank you all for being patient through my learning process ;) 

Full Kit:


The Contents:
One large turquoise Peony
Three medium sized yellow roses
One medium sized turquoise rose
Two miniature turquoise cabochons
One white crocheted flower
One yellow sun rosette
One eighteen inch burlap string and muslin banner
Two recycled corrugated cardboard butterflies
One nest with three loose paper eggs
One turquoise resin owl
One yellow and turquoise shabby kite with extra long tail
Five white doily clouds
Five white cardstock clouds
Three vintage book clouds

What do you think? Something you could create with?? 
Trying the Paypal buttons..

--RETIRED--

Tuesday, January 31, 2012

Love cast in clay!! (A blog hop)

Hello!! Welcome to my stop on the LOVE CAST IN CLAY hop!! Amazing Mold Putty and Creative Paperclay® Have teamed to bring you this fabulous blog hop!! 

There are two prizes available.. worth $25!! One on the AMP blog and one on the Creative Paperclay® blog -- you must comment on EVERY stop and become a follower of every stop to be eligible for the win!

Here is a list of the blogs in case you've become lost along the way:


And here is my project: 


I fell in love with this mini cameo and just had to use it! I cast the original in Amazing Molding Putty. When my mold was cured, I demolded the original and dusted the inside of the mold with Alumilite's Pearl dust. I then molded the piece out of the Air Dry Paperclay®. After a full 24 hours (to be sure it was dry) I took my piece out of the mold and brushed with a Martha stewart chocolate brown glaze. Before it had a chance to dry I wiped the piece with a wet cloth to take off the excess glaze!

Other products used: Teresa Collins paper, cardstock, MME cardstock, walnut stain distress ink, baker's twine, muslin and hot glue. 


Thanks so much for stopping by!!! Your next blog is that of Debbie Buckland!  

Wednesday, October 19, 2011