Showing posts with label Distressed Harlequin Background. Show all posts

Thursday, March 30, 2017

Steampunk Love Angel by Lynne

Hi UmWowStudio Fans.....
THANKS sooo much for stopping by the blog today!!


OK....so I stepped a bit out of my typical creative zone
to create this steampunk tag.


I used LOTS of UmWowStudio chippies on my tag.


Here is my little comedy of errors video
on how I created my Love Angel tag!
(please be patient as I am
still trying to figure out all this video stuff!!)


Thought I would share a few close ups of my tag.


Hope you enjoyed my creative journey.....
I know I did!
It's is ALWAYS GOOD to step out of one's
creative zone to try something a bit different......

Have a CREATIVE day!!

OTHER PRODUCTS USED
Tattered Angels
Glimmer Mist
Sapphire
It's Brown
Chocolate Covered Strawberries
Precious Metal

Glimmer Glam 
Bon Bon

Canvas Corp
Printed Cardboard
Postal

Perfect Paints
Polishing Plaster
Doves Wings

Ranger Ink
Multi Medium


Saturday, December 31, 2016

Lovely layers by Marta

We are welcoming back the super talented Marta as a guest creative team member today! Can you believe her incredible style? The layers are deliciously full of texture. She's right up UmWowStudio's alley!

Displaying marta.jpg


Our Leaf Stems look really incredible all layered up and included in this beautiful card.


Our Sketchy Circle peeks out of the layers.


The Distressed Harlequin BG makes a great embellishment piece dusted in white.

Thursday, September 15, 2016

Keeping it simple....


Hey Peeps....
Things here in Northern New Hampshire
are turning towards FALL!
(I'm not sure I'm ready for it!!)

I'm been doing a lot of traveling lately
so today I'm keeping things a bit simple!


I had a Chunky ATC that I covered
with a grey wood a while back,
and it's been sitting around collecting dust.

I had a few pieces of peeled paper from
an image transfer I had done, so,
I adhered them to my chunky ATC
and covered it all with Multi Medium!

I pulled out UmWowStudio's
Wonky Circle Stencil and a bit of texture medium.


When dry I spritzed with a bit of Glimmer Mist
and rubbed on a bit of Stucco to add another layer
of color and texture.


I had a tad bit of the
UmWowStudio's Distressed Harlequin


left over from another project
so I sprayed it with glimmer mist,
pounded on it with a hammer
and painted on a layer of Multi Medium
to keep it from bleeding.


I added a few flowers, a bit of vintage lace and twine
and a quote....
and my Chunky ATC is good to go!


I think I will wrap this up and ship it off to a
friend that I am sooo happy is in my life!

HOPE you have a WONDERFUL creative Day!!


OTHER PRODUCT USED:
Perfect Paints
Polishing Plaster ~ Apricot Lily
White Stucco

Tattered Angels
Rusty Red
Vintage Brass
Navy Blue

Yvonne Blair Designs
Card Sentiments

Petaloo
Mini Pearl Daisies
Garden Rosettes

Monday, August 29, 2016

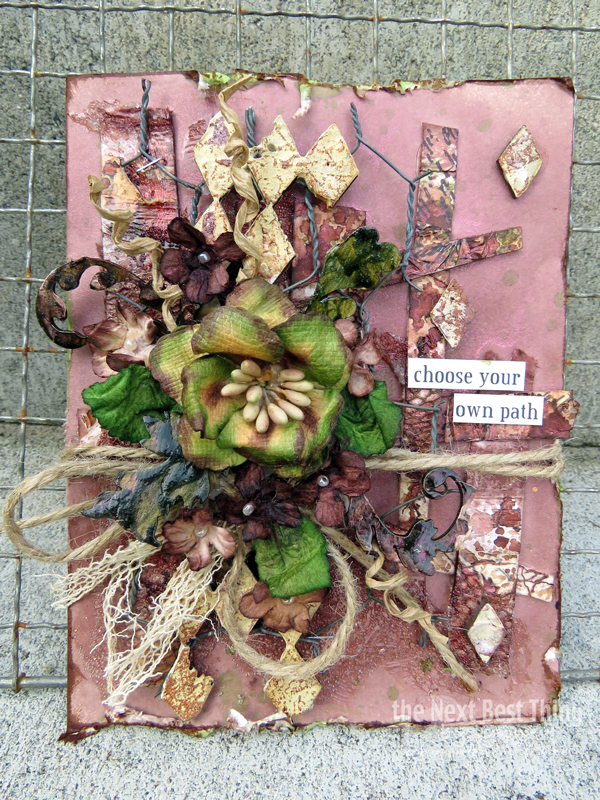
Choose your OWN path by Lynne

I am sooo excited to be posting today!!


THANK YOU for stopping by to take a peek...
to see how I created this greeting card.


I began my card by cutting strips of
a "paper" I made by adhering various strips
Tissuestock and vintage curtain pieces
to a piece of handmade chipboard.

I applied the strips to the card face and
spritzed the entire card with mist.


I then pulled out my box of UmWowStudio chippies
and chose
which I cut in half.


I then painted the chippie with gesso.


When dry, I spritzed it with mist.
LOVE how the color dried in the "pockets".


Next I pulled out a few pieces from the UmWowStudio


I globbed on some paint to color
the flourishes.


While my UmWowStudio chippies were drying
I started working on the rest...
I colored a few flowers,
and stapled a piece of chicken wire to my card.


I chose a bit of verbage to finish off my card.


a few more pictures....


Once again.....THANK BUNCHES for stopping by!!!!

Other Products used:
Canvas Corp Brands
Tissuestock
Ivory
Kraft
French Script on Ivory
Handmade Chipboard ~ white
Greeting Card ~ Ivory

Tattered Angels
Glimmer Mist
Olive Vine
Crushed Shells
Choco Covered Strawberries
High Impact Paint
Olive

Petaloo
DIY Paintables
Mixed Leaves
Mini Pearl Daisies
Ruffled Rose X 4

7 Dots Studio
Fortune Teller


Monday, September 28, 2015

Right Now: Mixed Media Scrapbook Page by Kris Berc

Hello UmWowStudio fans!  It's Kris here today with a fresh bold layout of my little girl featuring chipboard, flair, and a stencil from the UmWowStudio store!


I used the Checker Board stencil in a couple of ways on my background!

(I had bad lighting while creating my layout, so I apologize for the poor in-progress photos.)


After spreading a layer of clear gesso over a piece of white cardstock and allowing it to dry, I used the Checker Board stencil with a pencil to add some diamond shapes to the cardstock.


I then applied lots of color using sprays/mists, and when dry, I used the Checker Board stencil again, but this time with super heavy gesso, to add some white contrast and texture.


While my layout background was drying, I treated a Distressed Harlequin Background piece and some Diamond Confetti with black acrylic paint.


While the chipboard pieces were drying, I went back to my layout and randomly stamped a triangle stamp around the page with black ink.


UmWowStudio products used:
Checker Board stencil
Diamond Confetti
Distressed Harlequin Background
Oh the Places You'll Go Flair

other products:
patterned paper, stickers: My Mind's Eye
stamp: Viva Las Vegastamps
sprays: Dylusions, Heidi Swapp, Lindy's Stamp Gang
misc: washi tape, sequins

Friday, April 24, 2015

Magnum by Sindi Jeffers

Hi everyone! I'm just stopping by to share a quick tutorial that shows how I got this super cool glittery sheen on my UmWowStudio chipboard. Here's my layout:

So getting that watercolor sheen on the chipboard was super easy! I'm using this cute little UmWowStudio chipboard elephant to show you how I created the look. 


First, cover the chipboard with a thin layer of gesso and wait for it to dry.


Next, I used some pigment powder. I just scattered it randomly onto my chipboard. Then, I sprayed it with some water to make the color run.


Without waiting for the pigment to dry, I dripped some spray mist on there and sprayed it again with water. This causes the colors to run together and it creates a really cool effect.


 I also went around the edges with a black pen to add an extra touch. Here's the end result:

 I also realized there was a happy bonus to this little technique. When I lifted off the chipboard after all that spritzing, I had this amazing background splatter and was able to use it as the background for my layout.


UmWowStudio products used:
http://umwowstudio.com/chipboard/100185.html