Showing posts with label altered. Show all posts

Monday, June 12, 2017

"Put on your Cape" Grunge Wooden Tag


Hello creative people! Miranda here! I am SO HAPPY to be posting here for the
first time on this amazing team, full of so much talent! 
It truly is a dream come true, and I hope I may be able to share some
inspiration with you all during my time here! 
I had created a wooden tag very similar to this a few months ago,
however it was sent out to a trade show and came back
all messed up. I couldn't bare to trash it, so I decided to give it some
extra love and a remake! Enter Um Wow :)
What can I say.....DeeDee makes the best products! I even used her new
range with 7 dots! Squeal! 


I kept the colors pretty monochromatic with just browns, hints of gold. 
I love using alcohol inks and gold foil! 2 of my favorite mediums! Staples for me! 
And the chipboard took them so well!


I used the new stencil for Dreamscapes by DeeDee for 7 Dots on the "P", using micro beads and 
matte gel. Of course it was covered in alcohol ink afterwards :)


These butterfly wings are BEYOND gorgeous! I gold foiled them and the background 
hexagon and then highlighted with more alcohol ink. That was pretty much the technique 
through out the piece ;) 

Lastly for my title I just had to add one of the gorgeous crowns! If you are putting on
a cape to fly, throw on a crown too hehe! It blends a bit in the photos
but in person it is lovely.

And Just a close up of the ribbon and rope tied to the top, extra grungy of course .


I hope you like my project! I will be back to share a tutorial and new project soon! Hugs!

UmWow Products

Other products Used:
7 Dots Studio Dreamscapes Paper Collection
7 Dots Studio Dreamscapes Stencil
7 Dots Stuido Dreamscapes Sayings Stickers
7 Dots Studio Dreamscapes Die Cut Elements

Friday, January 9, 2015

Guest CT Member >> Mallika Bagaria!

Today we welcome the talented Mallika Bagaria to our blog for a special Guest Post :)

My name is Mallika Kejriwal. I am from India and I just moved to Chicago. I have loved colors, threads, ribbons and such since the age of 5 – I remember making pretty clothes for my dolls as a little girl.As I grew up, I engrossed myself in studies and forgot about my creative side. It was during my junior year of engineering (I am a computer science graduate), that I started making cards using newspapers, old scraps of paper etc. I stumbled upon a card making blog and was simply amazed by the amount of glamor that could be associated with a piece of paper. I started my own blog – Aola Handmade Cards – after undergrad and have not looked back since.I love teaching and inspiring via my Youtube Channel. Crafting is now not just a passion for me, it’s also an addiction! I hope to inspire you all with wonderful ideas and projects.


I am extremely honoured to be chosen as Guest Designer for UmWowStudio. Thankyou so much DeeDee for giving me this wonderful opportunity. I decided to do justice to UmWowStudio product by making a mixed media project. The chipboard pieces of this company was to die for. I wonder how much talent DeeDee Catron has for coming up with such amazing and versatile products. This whole project has alot of mediums and techniques used which you all can see very easily in this how to start to finish video which I have prepared for all you talented crafters.


Please click here to go straight to the video which shows the whole process.

Products Used from UmWowStudio - 
Distressed Harlequin Background
Heart Strings

Other Supplies Used - 
Prima Color Bloom Sprays, Prima Embellishments, Prima Flowers, Recollection Flowers, Tim Holtz Gears, Prima Tags - Seashore Collection 


Friday, April 18, 2014

Just Breathe by Jen Matott

Today we have the super talented Jen Matott joining us! She's a super cool gal with some insane talent and I'm totally pumped to have her on the blog.


My name is Jennifer Matott and I'm a mixed media artist and scrapbooker from outside of Syracuse, NY. I have been scrapbooking and creating mixed media art for over 20 years with a Bachelor of Fine Arts and Masters of Science in Art Education.

Mixed media allows me to get creative with imagery and still create a 3D effect using a variety of media. My pages lean towards the dramatic and I love experimenting with papers and pushing the limits of what is traditionally done.

I'm an art educator in a public school and believes anyone can create meaningful Art! Teaching art is what inspires me and keeps me learning! My young students teach me so much!

Currently, I design for Faber-Castell Design Memory Craft and Scrapbooking From The Inside Out. I have been published in several paper and online magazines, including Scrap N’ Art, Scrapbooking and Beyond, Scrapbook Trends, and others.


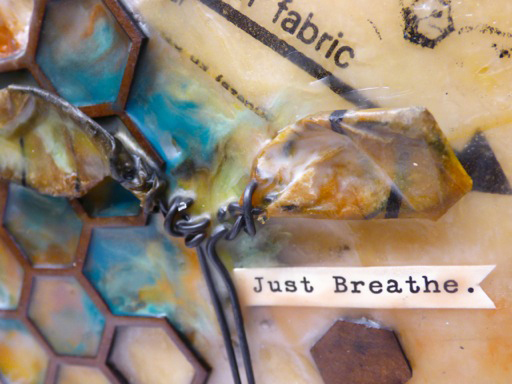
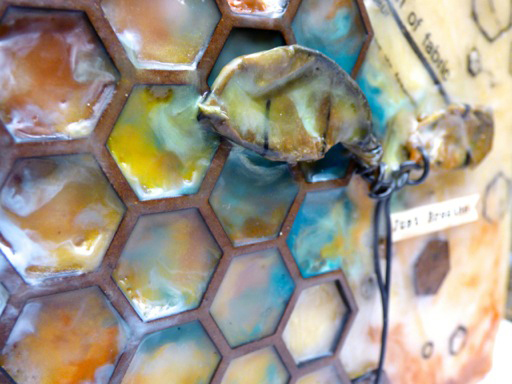
Hi UmWow fans... Jen Matott here as a guest CT for April! I'm so honored to be creating with these amazing products! I knew I wanted to keep the gorgeous brown color of these chipboard pieces! They are seriously WOW! So, I combined my love for encaustic and these fabulous shapes.


Encaustic is painting with melted wax. It's usually beeswax but can be other kinds of wax too. I use beeswax and damar resin colored by color sticks from Enkaustikos. I started with a wooden substrate with a deep set. I added a few layers of wax and then adhered the pattern paper onto the surface with a few more layers of wax brushed on.Then I added some colored wax and embedded the Hexagon Background piece and Hexagon Confetti!


More colored wax added in and around the honeycomb. This is the part I love most... embellishing!


I just keep adding color and use a heat gun to fuse the layers and allow the colors to swirl together! It also gets rid of most of the brushstrokes or imperfections!


Another fun technique is adding "drawn" details using an UmWow hexagon stencil and carbon paper or transfer paper in black. I place the carbon side down on the wax and place the stencil on top. I used a stylus to draw lines with the stencil and when you lift the paper off, you have black lines!


Finally, I made "wings" using wire, pattern paper and wax. They were embedding into the wax as well.


I love how this project came together and it was so easy to be inspired by these gorgeous shapes! I adored them and already have other encaustic projects in mind with other shapes! Thank you to UmWowStudio for inviting me to share my project today!


Supplies:
Hexagon Confetti Mask
Hexagon Confetti
Hexagon Background


Other Supplies:
Wood box
Sewing pattern paper
Wire
Enkaustikos Wax Medium
Enkaustikos Wax Snaps (Bone Black, Cadmium Red Vermillion, Cerulean Blue, Cobalt Teal Green, Titanium White, Antique Bronze Pearl, Super Gold Pearl,
Opal Calypso Green)
Enkaustikos Empty Tins
Carbon paper
Sticker: Cosmo Cricket

Wednesday, May 22, 2013

Super Star {A 12x12}

Today I've got this UBER FAB layout by Miae! I'm always so pleased to get to share work by the Creative Team! Miae mentions that her butterflies are like mini canvases, and that's exactly how they are! Our chipboard is thick and sturdy, ready for altering!


Miae says: "It was pure delight to work with these UmWowStudio chipboards! 


I treated each butterfly like a mini canvas. First I covered them with gesso, then with a crackle medium. Next came the gelato sticks, mists, and Pearl Ex powders. As for the triangles, I left them raw with just some splatterings of black ink. They provided just the perfect contrast for a girlie/grungy page!


Supplies:
Kroma Crackle medium, TA mists and Glimmer Glam, Heidi Swapp Color Shine, Faber Castell Gelatos
Pearl Ex powders, Angora watercolors, Other supplies from my stash"


Just STUNNING!! 

Sunday, April 14, 2013

An Altered Tray!

Hello dear friends! Today I have a project to share with you, not quite chipboard related but still very pretty to look at! 

Here is an Altered Tray in a very nautical theme!


The tray is from 7gypsies, the paper, tape and enamel dot are from Teresa Collins. I used Viva Las VegaStamps! Crown and Chevron banner, MME's Epoxy Brad, American Crafts pearl brad and wood grain thickers, Ranger's Stormy Sky distress stain, Amazing Mold Putty resin pelican from the previous UmWowStudio handmade embellishment kits, and from my stash: Floral beads, twine, cheese cloth, dymo label maker and a cork. 


You can get a quick tutorial on fitting paper inside little glass bottles on the CropChocolate blog post HERE.

I've been lucky enough to have been asked to inspire people at Anything But A Card!!! So you can see my piece for the ABAC Challenge #17!


Monday, February 4, 2013

Vday Ribbonista Hop!


Hello! Welcome to my stop today on the May Arts Ribbonista Hop :D

Today's Ribbonistas include:


I have a HUGE love for tags, and love putting all sorts of them together. So today I bring you a Love Story tag:


The two May Arts ribbons utilized in this beauty include
and
It's made from Echo Park's for the record cardstock and cardstock stickers. I also used Prima flowers, a My Mind's Eye brad, tissue tape from Teresa Collins, a stamp from Viva Las VegaStamps!, and a black pen.

Here's a closeup of the box pleat:

Now head on over to Vera Yates's blog to see what she's sharing today!

Don't forget... comment on all the blogs for a chance at four rolls of ribbon, YOUR CHOICE! :)

Friday, January 25, 2013

Blast from the Past!!!

Hello everyone :)


Welcome to the LAST stop on the Blast from the Past blog hop!! I'm so in love with all the projects that the team did using our oldie but goodie stamps, and I'm honored to have them all participate and use our images. Give them a big round of applause! Don't forget to comment on each post from the hop, as our prize winner will be randomly selected from one of the blogs :)

Now.. onto my project using a stamp that hasn't seen much love lately!

I had the lovely
to work with!


We recently hosted an altered mousetrap swap, and this is what I used her for! I pulled the mousetrap apart and gessoed all the pieces. Then I colored them with Tattered Angels glimmer mist and Distress Stain.
My stamp is stamped with Ranger's Archival ink in black and colored with Distress Markers. She's then fussy cut and glued to the mousetrap! Before I added any pieces back on I laid down some gel medium and inserted paper circles, e beads and floral beads.Then I glued the spring and trap back together, adorned it with a bit of paper and May Arts ribbon, and highlighted bits and pieces with Luminarte's silks paints!


Thanks so much for coming by!! If you missed any stops here they are again, and don't forget to COMMENT for a chance at the Plate O' Rubber of your choice :)
-

-

Thursday, January 10, 2013

CropChocolate DT Blog Hop!!

Hello!! Welcome to my stop on this wonderful hop introducing this season's cast of Design Team Members!!


I'm super stoked and honored to have been selected to serve with these fabulously creative girls. I can't wait to represent and support CropChocolate in all it's creative deal striving goodness!


My name is DeeDee and I go by D² on the CC boards :)

Here are the projects that I applied with:
an altered frame from globecraft memories using EP's This n That Charming. It screams me by being about my son, by being distressed and by being layered! 

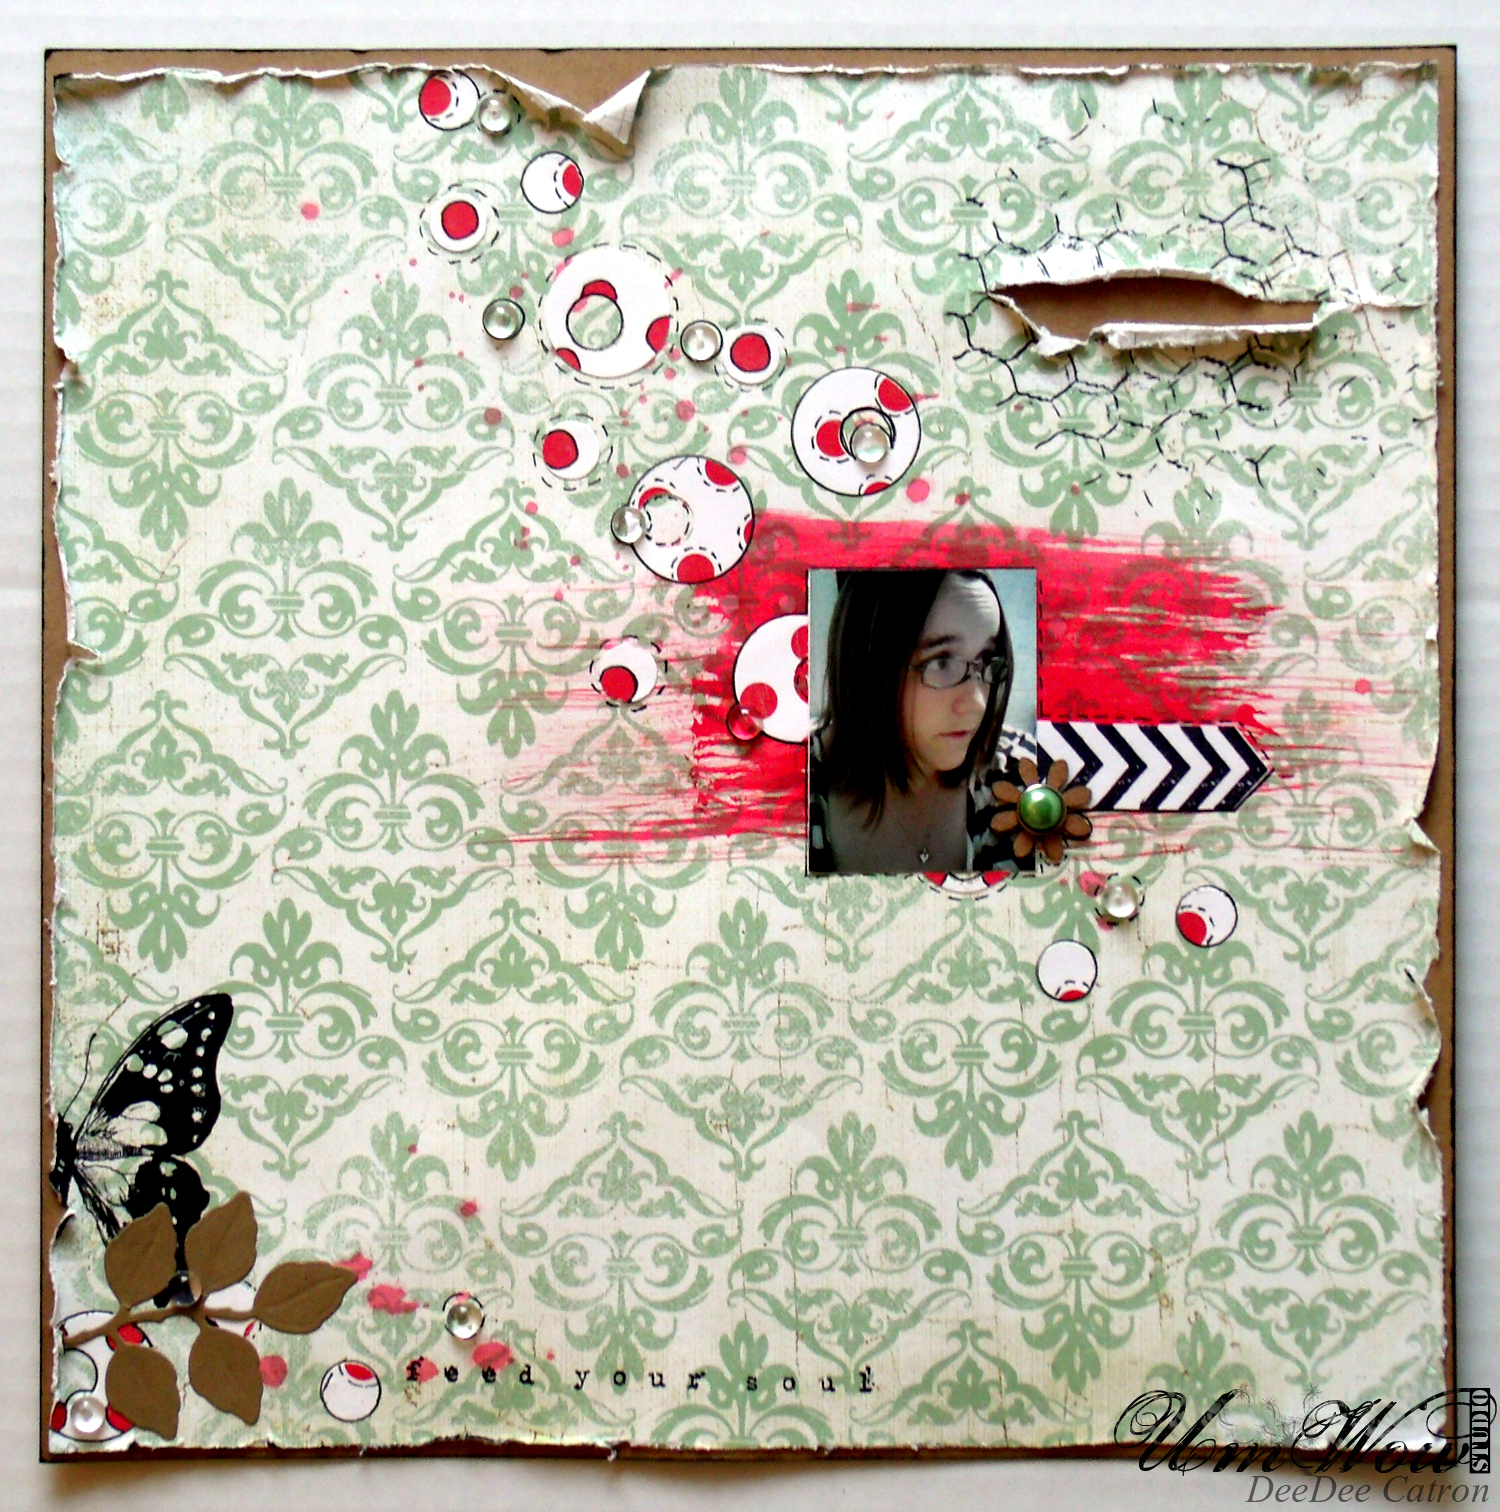
a 12x12 layout and counts as my out of the box. The layout is totally "my style", the mixing of products is totally "my style", but the subject is definitely out of my comfort zone. I always scrap my husband and my kidzilla, or somewhere we've been, something we've done.. but I NEVER scrapbook just me. This layout is titled "Feed your soul" and has just a picture of me on a regular day. Which I'm trying to tell myself is "ok". scrapbook more about what I want, what my dreams are, what I'd love to see or where I'd love to go.. it doesn't always have to be about someone else.

Five fun facts about me eh? Here goes!:

1) I'm a total David Bowie fan girl.
2) My favorite color changes about as often as I change socks (thank goodness that's frequent! lol)
3) I don't like cooked apples
4) I actually PREFER ice water to other beverages
5) I'm a softy.. I cry in almost every single movie. seriously. :D

Here is the list of participants, keep on hopping and meet the amazing team!

Amber - http://ambaju.blogspot.com/ --start here!--


Polly - http://pazasproductions.blogspot.com/ --you came from here--
DeeDee - www.umwowstudio.com --you are HERE--
Miwa - http://miwannascrap.blogspot.com/--go HERE next--

P.S. GIVEAWAY!!! Become a follower and leave a comment to earn your chance at an UmWowStudio prize bundle!! 

Wednesday, November 14, 2012

VLVS! December Daily Spectacle


Starting the 19th we'll be having a having a party @ VLVS!, too! A week full of ways to use the December Daily Plate! I hope you'll join us there, too :) 

Friday, October 26, 2012

A Candy Dish!

Here's a project I had on the May Arts blog yesterday!


Check out the full post here including a DIY video on making the cute 3D Pumpkins :)

Supplies used:

I was just made aware that I was one of the top three winners for the EP Chillingsworth Manor contest!! Check that out HERE.

Saturday, August 18, 2012

Altered Spoon Blog Hop!!

I was so super honored to be asked specifically by Susan to help her celebrate her blog-versary... I chose to go nautical with my spoon.


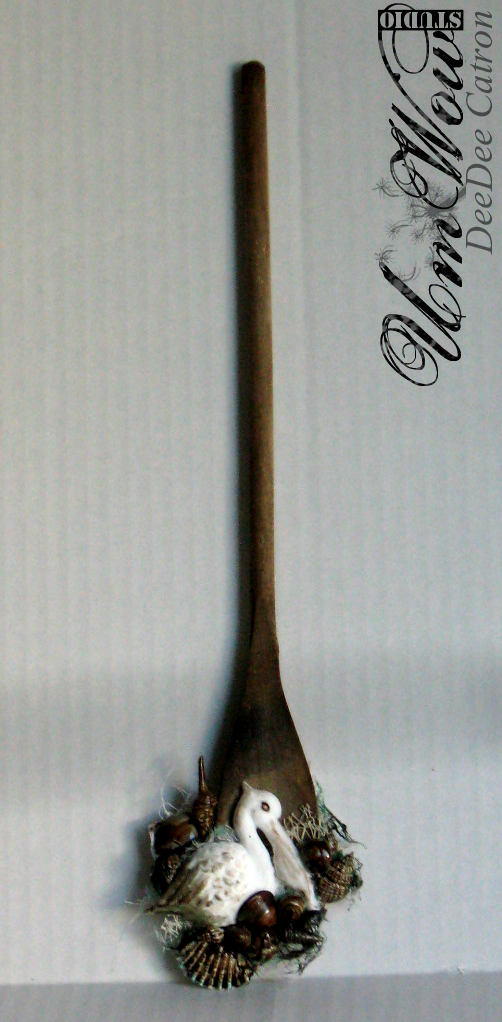
First I started off by aging the spoon with a solution of vinegar and steal wool. Put the steal wool in a jar of vinegar and allow it 24 hours to "cure". Then brush the vinegar mixture over your spoon.


To finish off the spoon I used UmWowStudio's August handmade embellishment kit "Beach Combing" as well as the add on kit All Resin All The Time. Other products include a netting ribbon by May Arts to simulate a fishing net, cheese cloth, Tattered Angels glimmer glaze in Waterfall and Coconut Shell, Helmar's quick dry adhesive, and collected shells from the beach!


In this last photo you can really see the dimension and beauty that the spoon has.
For a quick tutorial on altering the resin piece visit the Amazing Mold Putty blog. :) 
------
Presenting the artistes de spoon...

Friday, August 17, 2012

Using the August Kit!

Tomorrow I'll be joining in a SPOON ALTERING blog hop to celebrate a super close friend's Blog-versary:

so stay tuned to see how I used this month's kit and add on to alter my spoon!!!

Friday, July 13, 2012

How do YOU Measure Success?


In being happy with yourself?

By the amount of work you get done?

by reaching end goals in general?

I think today success means to me... having five projects attend CHA for 2 different booths :) 


Four in the HobbyBaby/Globecraft Memories Booth - and one in the WOW Embossing Powder booth!

I'll share sneak peeks throughout the week and let you know where you can find such goodies :) 

Wednesday, May 30, 2012